Potato Bacon and Cheese Pizza

Last night we we decided to go out for dinner on campus for the first time in a verrrrry long time. We hit up a Pitt classic, Fuel and Fuddle, where we both ordered a personal brick oven pizza. Declan ordered the plain ol’ pepperoni and cheese and Erica tried something new – a potato pizza.

We were both blown away at how delicious it was! But before we devoured this new discovery, we did some dissecting to see what really went into this new creation. We realized we already had everything we needed to make it at home and you probably do too!

If you’ve ever tried our mashed potatoes recipe you know that it makes quite a bit and there are usually leftovers. This recipe is a perfect way to use up those leftovers.

Also, another good point here to make is that pita bread is perfect to use for personal pizzas. As long as you can keep a few on hand with some kind of sauce and some kind of topping, you’ll save yourself from buying a $10 pizza somewhere else!

Potato Bacon and Cheese Pizza

A new twist on a college classic. Don’t be afraid, just give it a try!
  • Servings – 2 personal pizzas
  • Prep time – 5 minutes
  • Cook time – 10 minutes

Ingredients

  • 2 pita loaves
  • 1/3 cup of your favorite shredded cheese
  • 1 cup mashed potatoes
  • 1/4 cup bacon bits
  • 2 tablespoons ranch dressing

Protocol

1. Preheat your oven to 400ºF.

2. On a baking sheet or pizza stone, place 2 pita loaves next to each other and smear on the potatoes (the 1 cup is just an estimation, add as little or as much as you’d like).

3. Drizzle over a little ranch dressing on the potatoes.

4. Sprinkle on the bacon bits (here is how to make bacon since we’ve never posted that before).

5. Sprinkle on your favorite cheese and cook in the oven for 10 minutes.

6. Let cool for 2 minutes and enjoy!

-D&E

Another Easy Pasta Meal

We hope everyone had a great Labor Day with their friends and family. We certainly did! We drove down to DC to see Abbey Road on the River, a Beatles tribute festival, with Erica’s family. Being Beatles fans, we had a great time! And we also ate a lot of good food!

Now, since it was Labor Day and in reality supposed to be labor free, we decided to post a simple recipe today. This dish is extremely easy to make on a busy weeknight and requires minimal clean up. Erica grew up with this dish since her dad made it quite often on their busy nights. Actually, her dad made it for us over the long weekend.

Today’s recipe is another pasta recipe which only needs 2 ingredients other than the pasta. This might be the easiest recipe we’ve posted to date…but hey, it was Labor Day weekend, we deserve a little break.

Tomato and Butter Noodles

Sort of like an adult version of butter and noodles…

  • Servings – 3 to 4
  • Prep time – 10 minutes
  • Cook time – 5 minutes

Ingredients

  • 1 pound macaroni noodles
  • 1 can (28 ounces) diced tomatoes
  • 1 stick unsalted butter
  • Salt and pepper

Protocol

1. Cook your pasta, drain, and set aside.

2. In the large pot you just used, melt 1 stick of butter (or less if you’d like).

3. Once butter is all melted, add in the can of diced tomatoes and heat for 2 to 3 minutes. Stir a couple of times to make sure they don’t separate.

4. Add the pasta back to the pot and add as much salt and pepper to your liking.

5. Serve right away and enjoy!

-D&E

Easy Enchiladas

You might be thinking that we would be all Mexican-Maxed-Out from our trip to California. Wrong. We’re going through withdrawal. That’s why this week we just had to use the authentic corn tortillas we got (actually stole, thanks Auntie Connie!) from LA.

There really is no correct way to make enchiladas. This recipe is what we’ve found to be cheap, healthy, and really easy to make. As you can see, we use corn tortillas because, well, its the authentic thing to do. Plus they just make the dish. You can also use flour tortillas or whole wheat tortillas instead, but you just won’t get that Mexicaness out of them.

We know we’re harping about using corn tortillas because of their authenticity, but in typical D&E fashion, we contradict ourselves by using ground turkey instead of ground beef in this recipe. We’ve found that ground turkey is a perfect healthy substitute for ground beef and is actually really good. You actually don’t need any meat in this recipe, you can easily add more veggies to the mix instead.

Now onto the recipe…

Turkey Enchiladas 

A healthy alternative to the original dish but still just as tasty!
  • Servings – 9 to 12 enchiladas
  • Prep time – 5 minutes
  • Cook time – 15 minutes
  • Bake time – 20 minutes

Ingredients 

  • 1 pound ground turkey
  • 1 green pepper chopped
  • 1 medium onion chopped
  • 2 cloves garlic finely chopped
  • 1 1/2 tablespoons taco seasoning
  • 2 cups shredded Mexican cheese mix
  • 1 can re-fried beans
  • 12 ounces enchilada sauce
  • 9 to 12 corn tortillas
  • Sour cream (optional)

Protocol

1. Brown the ground turkey for 5 to 7 minutes. Since ground turkey is more “pasty” than ground beef, make sure to keep breaking it up as it browns.

2. Add 1 tablespoon of the taco seasoning and the garlic to the meat and incorporate.

3. Add the chopped onion and pepper and sauté with the meat for 2 to 3 minutes.  The vegetables shouldn’t be completely done yet – they’ll cook more in the oven.

4. Add the rest of the taco seasoning (1/2 tablespoon) to the mixture, incorporate, and turn off the heat.

5. In a small sauce pan, heat up the re-fried beans for 2 to 3 minutes. Just enough to it can be easily spread.

6. Pour and spread a thin layer of enchilada sauce over the bottom of a 9×13 inch baking dish.

7. To ensure the tortillas don’t break, zap 3 in the microwave for 15 seconds.

8. Pour 1/3 cup of the meat and veggie mixture into the middle of the tortilla.

9. Add a sprinkle of cheese on top.

10. To “glue” the enchilada together, spread beans on one half of the tortilla, fold the plain side down first, and wrap the “beaned” side over that.

11. Fit as many enchiladas together into the dish (seam side down), pour and spread the rest of the enchilada sauce over top, and finish off by sprinkling the rest of the cheese evenly.

12. Cover with aluminum foil and bake for 20 minutes at 350° F or until the cheese is melted and bubbly.

13. Serve with a bit of sour cream and/or spanish rice and enjoy! Serve to friends to impress or keep the rest for yourself for lunch and dinner the next couple days!

-D&E

(Also – just want to shout out a quick HAPPY BIRTHDAY! to Erica’s sister Tara, who is also an amazing cook and has influenced Erica a lot! 🙂 )

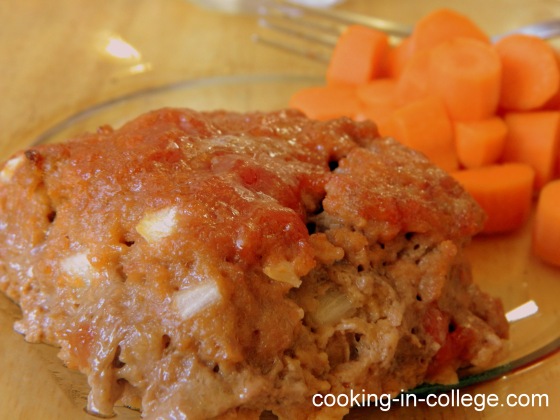
Cooking in College Meatloaf

You know what’s easy to do? Cooking meatloaf. You know what’s hard to do? Blogging about meatloaf. What are we supposed to say? It’s loafy, it’s meaty? We’re not exactly sure so we’re going to stick to the facts – It’s simple to make and it’s cheap to make.

Our method of making meatloaf is adapted from one of our cookbooks. We wish we could make our Moms’ versions of meatloaf but they are both reluctant to give out their recipes (one trick they use to get us to come visit them more – good homecooked meals!)

Anyway, we’re just going to dive right into this one. But here is one quick tip, there are countless ways to make meatloaf. You pretty much can’t go wrong if you stick to the basics. And since we are in college, this is our basic way to create a tasty meatloaf.


Meatloaf

It’s loafy, it’s meaty.
  • Servings – 6 mini loaves
  • Prep time – 10 minutes
  • Cook time – 20 minutes

Ingredients

  • 1/2 cup ketchup
  • 1/4 cup apple sauce
  • 2 tablespoons brown sugar
  • 1/2 cup pancake mix
  • 1/4 teaspoon pepper
  • 1 small onion finely chopped
  • 1 egg
  • 1.5 pounds of meat loaf mix (or 1 lb lean ground beef and 1/2 lb of ground pork)

Protocol

1. Heat your oven to 450º F.

2. In a mixing bowl, mix together ketchup, apple sauce and brown sugar together until evenly incorporated. Reserve on the side 1/4 cup of this sauce.

3. Mix in the rest of the ingredients in the mixing bowl with your hands. This will get messy.

4. When everything is incorporated nicely together, spray a 13×9 inch baking dish with cooking spray and place loaf in the center.

5. Still using your hand, work the loaf into an approximate 12×6 inch rectangle. Divide this into 6 equal size mini loaves using a spatula. Separate them to leave about 1/2 an inch between them.

6. Brush onto the mini loaves the remaining 1/4 cup of the sauce from Step 2. If you want more, just mix together more ketchup and brown sugar.

7. Place baking dish into the oven and cook for 18 minutes and let stand for 2 minutes before serving.

8. Serve with a side of veggies and enjoy!

-D&E

P.S. – Do you have a special way or “ingredient” that you use in your meatloaf? If so, share it in the comments below!

Chicken and Dumplings

Even though it’s summer time, we love to whip up a nice hot soup every once and awhile. Our joy for good food and cooking outweighs a hot kitchen without AC…yeah we’re a little weird.

One of our favorite soups to make is chicken and dumplings. It’s nutritious and easy to make, especially if you have some left-over chicken laying around (well not laying around, hopefully its covered and in the fridge). If you don’t have any, just season some boneless chicken breasts with salt and pepper and cook (with olive oil) over medium heat for about 3-5 minutes a side or until they aren’t pink in the middle. You are going to shred it eventually so it’s okay if you cut them into smaller pieces first.

All the other ingredients are pretty straight forward. “D&E, where do we get dumplings?” Oh right, well we use our friend Pillsbury Dough-boy’s Grands Frozen Biscuits. You can also substitute with gnocchi, which is quite tasty.

Chicken and Dumplings

  • Servings – 5 to 6
  • Prep time – 15 minutes
  • Cook time – 30 minutes

Ingredients

  • 4 carrots peeled and chopped
  • 3 celery stalks chopped
  • 1 medium onion chopped
  • About 1-2 chicken shredded breasts
  • 3 cups chicken broth
  • 1/2 cup water with dissolved chicken bouillon cube
  • 1 can cream of mushroom soup
  • Grand’s Frozen Biscuits, thawed and quartered
  • 1 teaspoon dried parsley
  • 1 teaspoon dried sage
  • 1 teaspoon dried thyme
  • 1 pinch dried rosemary (you can play with the amounts of all the herbs as much as you want!)

Protocol

1.) Over medium heat, in a large pot, sauté the carrots, celery, and onion in olive oil in the pot for 7 minutes or until the vegetables become tender.

2.) Add in chicken broth, water with the dissolved chicken bouillon cube, shredded chicken, can of cream of mushroom soup, parsley, sage, rosemary and thyme and bring to a simmer.

3.) Evenly drop in the quartered pieces of biscuit (there should be 12!), cover the pot, and simmer for another 5 minutes or so, until the biscuits are cooked through (they’ll get really big).  They will still be doughy, but no longer raw.  You can also adjust the amount of  biscuits you use depending on how many dumplings you want.  We like dumplings, so we use a lot!

4.) Serve and enjoy!  The leftovers keep great and make a delicious lunch.

-D&E

Not Your Average Lunch Ladies

Did you know that in some parts of Europe they call their mid-day meal dinner? So for our European readers, this post is about how to eat a healthy dinner for only a few pence a day. Now back to speaking American, since we’ve already discussed time and money-saving tips when it comes to breakfast, why not give lunch a try?

“D&E, you can’t possible be suggesting I run back to my apartment or dorm and whip up something for lunch everyday?! Isn’t easier to just buy lunch?”

Easier for you, yes. Easier on your wallet, no. We completely understand where you are coming from though. For some reason there is a general idea that lunch is the one meal a day college students should go out and buy. With class, work, and projects we have no time to cook anything in the middle of the day.

Fear no more, we have come up with only two options for lunch: Continue reading

First Recipe Post – Balsamic Braised Chicken!

Yes the time has finally come! As promised we are going to show you how to make Balsamic Braised Chicken over Couscous.

“Whoa, D&E this sounds hard to make…and a little too fancy for college students.”  Trust us, it’s neither hard nor fancy. But first, we do need to go over some technique regarding the use of knives. We found the following video perfect for any beginner and highly suggest watching it before moving on.

If you need to watch this video again in the future, we’ve added it to our “Resources” page under videos. Onto the recipe:

Balsamic Braised Chicken over Couscous

This recipe will impress friends and family but only takes minimal effort and time.  It is flavorful AND healthy.  It also keeps great as leftovers, so go ahead and make all three servings (just store the chicken and couscous in separate containers)!
  • Servings – 3
  • Prep time – 5 minutes
  • Cook time – 20 minutes

Ingredients:

  • 3 boneless chicken breast halves (they’re normally sold as halves)
  • Salt
  • Pepper
  • 2 cloves of minced garlic (watch this quick tutorial first)
  • 1 tablespoon olive oil
  • Small onion
  • ¼ cup balsamic vinegar
  • 1 can (14.5 oz) diced tomatoes
  • ½ teaspoon dried basil
  • ½ teaspoon dried oregano
  • ½ teaspoon dried thyme
  • ¼ teaspoon dried rosemary (if the leaves are too big, break them up with your fingers before adding or else you might get a big bite of just rosemary later)
  • Couscous

Protocol:

1.  Cut onion crosswise into long slices.

2.  Season chicken breasts with salt and pepper (just a small sprinkle on each side).


3.  Heat about a tablespoon of the olive oil over medium heat in a large, high walled skillet. This should take a minute or two.

4.  Add chicken to skillet. Add onions around chicken. Flip chicken over after 3 minutes (or until lightly browned).

5.  After another 3 minutes, add canned tomatoes, balsamic vinegar, chopped garlic, and dried herbs.  Make sure everything is incorporated together. Note:  If you don’t know if you like  balsamic vinegar (we use it all the time!), you can substitute half with chicken broth or stock. 1/4 cup is 4 tablespoons, so use 2 tablespoons broth and 2 tablespoons vinegar. Also, if you use the broth, buy it in one of the resealable boxes instead of a can. They’re a little more expensive, but will last up to two weeks in the fridge.

6.  Reduce heat to medium-low, cover with lid, and simmer for 5 minutes.

7.  Start water or broth for couscous. Follow the directions on the container.

8.  After 5 minutes, flip over chicken and simmer for another 5 minutes.

9.  Serve over couscous and enjoy!

For a little added bonus – the total cost per serving is just under $3, and this is one of our more expensive meals! Make sure to tell us how your experience went and if you have any other tips or suggestions in the comment section below.

-D&E