BBQ Chicken Quesadillas

Did your Mom or Dad ever make quesadillas for you growing up for dinner? Did they usually consist of two tortillas with a couple slices of American cheese melted inside? Yeah, it’s time to make “grown up” quesadillas now.

Today’s recipe is so simple! If you already have cooked chicken on hand then it’s even simpler. We’re not sure why we don’t make quesadillas all that often, we always seem to have tortillas laying around and there is hardly any cleanup involved after!

What do you like in quesadillas?

BBQ Chicken Quesadillas

Print this recipe!

Why have we not made these before??
  • Servings – 1 quesadilla
  • Prep time – 5 minutes
  • Cook time – 10 minutes

Ingredients

  • 2 flour tortillas
  • 1/3 cup cooked, shredded chicken
  • 1/2 green onion, chopped
  • 1/4 cup shredded cheese (cheddar, mexican mix, whatever you have)
  • Barbecue sauce

Protocol

1. On a tortilla, layer the ingredients in the following order: half the cheese, chicken, drizzle some BBQ sauce, onions, rest of cheese, and the other tortilla.

2. Spray your pan with some non-stick spray and heat over medium heat.

3. Add your quesadilla to the pan, being careful to not let the insides spill out. Use two spatulas if you have to.

4. Cook for about 3-4 minutes or until the tortilla is brown and crispy (not burnt!). Flip and cook the other side.

5. Using a pizza cutter, slice into quarters and enjoy!

-D&E

Easy Chicken Pot Pie – Give-away Contest Post 2

***Update: this contest is now closed***

So far this contest is going quite well! And today everyone has a chance to add to their chances (redundant?) of winning a free Cuisinart Immersion Blender. Last week we posted how you can enter so check it out in case you have not read it yet!

For this week to enter this is what you need to do:

  • Go onto our Facebook page and share the following photo (we have the photo there already, you just need to hit “Share”):

  • Go to our twitter page and re-tweet the following photo (we have the photo there already, you just need to hit “Retweet”):

If you do one or both let us know by commenting ON THIS POST so we know to enter you. If you only share a photo on facebook or only retweet one, you will only get entered twice. If you do both you get your name entered four times into the drawing! Yes, we are upping the ante…just wait until next week for our next task!

Now time for today’s recipe. We decided to try some simpler recipes for our readers who don’t want to buy a lot of ingredients. Today- chicken pot pie!

Easy Chicken Pot Pie

Only 6 ingredients but a lot of deliciousness!
  • Servings – 6-8 servings (it refrigerates awesomely for leftovers)
  • Prep time – 5 minutes
  • Cook time – 30 minutes

Ingredients

  • 1 bag frozen veggie medley (10-16 oz), thawed
  • 1 can cream of chicken soup (try the kind with herbs if you want)
  • Leftover cooked chicken, as little or as much as you want (we used 1 large breast), cubed/shredded
  • 2 cups pancake/all-purpose baking mix
  • 1 cup milk
  • 2 eggs

Protocol

1. Pre-heat oven to 400°F.

2. In a pan (9″ pie or 7 x 11 dish, or whatever you have), mix the soup, chicken, and veggies. Make sure the veggies are thawed and not frozen!

3. In a separate bowl, mix the baking mix, milk and eggs. Pour this batter over the chicken and veggies.

4. Bake for 25-30 minutes or until the crust is golden brown.

5. Serve and enjoy!

-D&E

PS- you can halve the batter ingredients if you have a smaller dish or just want less crust, but we like crust.

Another Easy Pasta Meal

We hope everyone had a great Labor Day with their friends and family. We certainly did! We drove down to DC to see Abbey Road on the River, a Beatles tribute festival, with Erica’s family. Being Beatles fans, we had a great time! And we also ate a lot of good food!

Now, since it was Labor Day and in reality supposed to be labor free, we decided to post a simple recipe today. This dish is extremely easy to make on a busy weeknight and requires minimal clean up. Erica grew up with this dish since her dad made it quite often on their busy nights. Actually, her dad made it for us over the long weekend.

Today’s recipe is another pasta recipe which only needs 2 ingredients other than the pasta. This might be the easiest recipe we’ve posted to date…but hey, it was Labor Day weekend, we deserve a little break.

Tomato and Butter Noodles

Sort of like an adult version of butter and noodles…

  • Servings – 3 to 4
  • Prep time – 10 minutes
  • Cook time – 5 minutes

Ingredients

  • 1 pound macaroni noodles
  • 1 can (28 ounces) diced tomatoes
  • 1 stick unsalted butter
  • Salt and pepper

Protocol

1. Cook your pasta, drain, and set aside.

2. In the large pot you just used, melt 1 stick of butter (or less if you’d like).

3. Once butter is all melted, add in the can of diced tomatoes and heat for 2 to 3 minutes. Stir a couple of times to make sure they don’t separate.

4. Add the pasta back to the pot and add as much salt and pepper to your liking.

5. Serve right away and enjoy!

-D&E

Banana Pancakes

We love breakfast, especially on Saturdays. If we’re not at our favorite breakfast joint, P&G’s Pamela’s, we’re in the kitchen making our own.

The only problem we run into is what to make. Declan prefers a nice hearty breakfast because his Dad always made big breakfasts on Saturday mornings – eggs, bacon, toast, you name it. Erica likes a lighter breakfast – crepes, fruit, sometimes eggs. So we compromise,  by making banana pancakes!

As you already know, we have bananas for breakfast throughout the week. But sometimes, they become too ripe. So instead of throwing them out, we put them in a freezer bag and pop that in the freezer. Frozen bananas are perfect for many things because when they thaw they are nice and mushy. The mushiness is what allows us to incorporate bananas into our pancakes. Allow us to explain…

Banana Pancakes

To make this really convenient, we use a good quality pancake batter mix that also doubles as biscuit batter mix. See, we’re still thinking ahead.
  • Servings – 6 to 8 pancakes
  • Prep time – 5 minutes
  • Cook time – 5 minutes

Ingredients

  • Pancake batter mix
  • 2 frozen bananas
  • Egg (if the pancake batter mix calls for one)
  • Water or milk
  • Cinnamon

Protocol

1.) Take the peel off of your frozen bananas by slicing off the ends with a paring knife and making two slits down the “belly” of the banana and it’s “back”. The peel should come right off.

2.) Slice bananas into 1 inch coins and place in a microwave safe bowl (we used our mixing bowl) and microwave for 60 seconds. This is the fastest way to thaw them.

3.) Mush bananas with a spoon until an even liquid consistency. If bananas still aren’t thawed, mix in a little hot water (no more than a couple tablespoons).

4.) Read your pancake batter mix’s instructions. Two bananas yield about 1 cup of liquid so subtract this about from the amount of water (or milk) the instructions call for. Add in the difference of liquid (water or milk),  dry pancake batter mix, egg (if it calls for one) and a pinch of cinnamon to your mixing bowl and mix until batter is formed. Don’t worry if its a little lumpy.

5.) Heat your skillet or griddle over medium-low heat and spray with Pam or grease with butter. Wait for it to be hot before moving to step six.

6.) Using a 1/4 cup measuring sup, scoops of batter onto the skillet. Don’t crowd the pan, it’ll make it harder to flip. We only put 3 on a skillet.

7.) Flip pancakes over with a spatula once the edges begin to bubble and turn brown. Or refer to this on when/how to flip a pancake.

8.) Cook until pancakes rise, about another minute or two.

9.) Lather in butter and maple syrup and enjoy!

-D&E

P.S. – We’re just as surprised as you are that we went this entire time talking about frozen bananas without making an Arrested Development reference.

Veggie Week: Part II

Do you think we could get #veggieweek to trend on twitter? We might give it a try. Anyway, today we are showing you how to sauté vegetables. Actually, we’re not going to show you, this highly instructive video is going to show you…

Don’t laugh – it really is that simple! Now onto our recipe…

Sautéed Zucchini and Yellow Squash

Light, tasty, perfect – there aren’t enough words to describe this side dish. Sometimes we just eat it by itself, other times we enjoy it with a nice steak.
  • Servings – 2 to 3
  • Prep time – 10 minutes
  • Cook time – 10 minutes

Ingredients

  • 1 zucchini
  • 1 yellow squash
  • 1 medium chopped onion
  • 2 tablespoons of butter or olive oil
  • 1 clove of garlic finely chopped
  • Pinch of oregano

Protocol

1. Cut your zucchini and squash into 1/4 inch slices.

2. Over medium heat, add your butter or olive oil to the pan.

3. Add zucchini, squash, onion and garlic into the pan and cook until the veggies become tender, approximately 6 minutes.

4. Season with oregano, salt, and pepper and enjoy!

Fast and simple! Here is another variation to this recipe that is just as yummy! What did you pair this side dish with?

-D&E

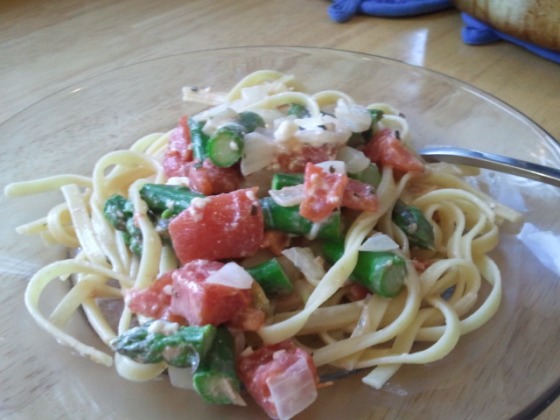
Asparagus and Tomato Pasta

Yes we are already putting you to the test to make sure you paid attention to Tuesday’s post! This is our first pasta recipe and you better be ready, because it is not your traditional red sauce and spaghetti. “But D&E, I’m only in college, I thought tomato sauce from a jar would be okay to make?” We only have one quip with tomato sauce from jars…or maybe two or three:

  • Why pay the $4?
  • You can easily make your own – with more nutritional value
  • They just don’t taste good as homemade!

Okay we are done quipping for now. The point we are trying to make is that although you are in college, you can still make a fantastic meal instead of always buying one in a jar, or in a can, or in a box. But don’t worry, we’ll start you off easy with this more original pasta recipe.

Oh, and one more thing (promise it is not a quip) – don’t be afraid of asparagus! It really is delicious and easy to incorporate into a lot of recipes (hint: this won’t be the last time you see it on this blog!).

Asparagus and Tomato Pasta

If you haven’t tried asparagus yet, or you have and didn’t like it, this is the perfect recipe to try (or re-try) it! With so many flavors and textures you won’t even know it’s even there. AWKWARD DISCLAIMER: Asparagus can make your pee smell funny…just wanted to give you a heads up since we were confused when it happened to us.
  • Servings – 3 to 4
  • Prep time – 10 minutes
  • Cook time – 10 to 12 minutes

Ingredients

  • 1/2 pound of your favorite pasta
  • 1 pound fresh asparagus stalks
  • 1 can (15 ounces) crushed tomatoes
  • 4 ounces of crumbled Gorgonzola or grated Parmesan cheese
  • 2 tablespoons olive oil
  • 1 medium onion, diced
  • 2 teaspoons dried parsley
  • 1 teaspoon dried basil
  • 1 clove garlic, finely chopped

Protocol

1. Start the water for the pasta.

2. Rinse the asparagus under cool water and break off the bottom third of the stalk. If you bend the stalk, it will naturally break off where it needs to. Discard the bottom portion.

3. Cut the asparagus stalks into 1 inch pieces.

4. After the water is boiling and you’ve added a pinch of salt, add the pasta to the pot.

5. When there is 5 minutes left cooking the pasta, add the asparagus to the water. For example, we used fettuccine which has a cooking time of 12 minutes according to the box; so, we added the asparagus after 7 minutes of cooking.

6. Drain the pasta and asparagus after the allotted time and set aside. Do not rinse.

7. Heat the olive oil over medium heat in a large sauce pan. Add the diced onion and garlic and saute for 2 minutes.

8. Drain the can of tomatoes and add to the sauce pan as well as the basil and parsley. Heat for 1-2 minutes.

9. Add the asparagus and pasta and cheese to the pan and stir to get everything incorporated.

10. Enjoy!

Let us know how this recipe went and if you have any suggestions, leave them in the comments below!

-D&E

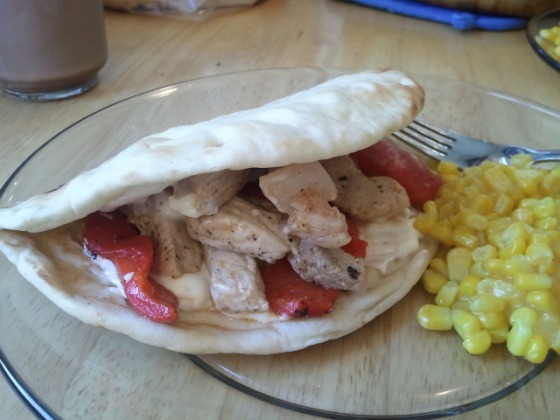
Peter Picked Peppered Pork Pitas

Try saying that tongue-twister ten times in a row. Today’s recipe was passed down to us from a little old lady from the Greek Isles…just kidding we found it in one of our cookbooks. “Hey, what’s the deal here, I thought there was going to be a theme for this week? You started Monday with Mexican food, but now Greek food?”

Stout observation, but no, the theme for this week is not Mexican food. It’s actually “Stuff-You-Cook-In-A-Pan-And-Serve-On-Edible-Circles” Week, and you thought we were your typical cooking blog! Come on, we’re way more original than you think.

 So for this week we are introducing you to a recipe that is very quick to make and as always, delicious!

Peppered Pork Pitas 

You can really impress your friends and family with this easy and oh-so-tasty meal. Although you can probably roast your own red peppers, we think it is easier (and way more convenient) to just buy a jar from your favorite grocery store.  They run about $3 a jar.
  • Servings – 3 to 4
  • Prep time – 10 minutes
  • Cook time – 10 minutes

 Ingredients

  • 1 pound of pork chops
  • 7 oz jar of roasted red peppers (we buy a 12oz jar, use half, and keep the rest for quick and yummy pasta and pizza toppings)
  • 3-4 pitas
  • 1/3 cup of mayonnaise (use light or low-fat!)
  • 2 tablespoons of milk
  • 2 cloves of finely minced/chopped garlic
  • Salt
  • Pepper
  • Olive oil

Protocol

1. Cut your pork chops into slices (finger-thick).

2. Drizzle a little bit of olive oil over the slices, just enough to coat, and season with salt and pepper.

3. Over medium heat, cook the pork slices in the pan for about 5-6 minutes, until pork is no longer pink in the middle. While pork is cooking, drain the peppers and cut into strips.

4. Once pork is cooked through, pour in the roasted red peppers and cook over medium-low heat until the peppers are hot.

5. While this is heating, combine mayo, milk, and garlic into a bowl and mix together in a bowl until everything is incorporated. 

6. On a pita loaf, serve the roasted red peppers and pork and drizzle with the garlic mayo cream. Serve with a side of veggies (we had corn on hand) and enjoy!

Let us know how it went and if you have any suggestions in the comments below!

-D&E