Sweet Creamy Gnocchi

We’ve been so busy lately that we have been desperately searching for really quick, 20-minute dinner recipes that you don’t have to do much prep work for. We got lucky and stumbled across a recipe that looked pretty good, so we adjusted it to our likings and what we already had on hand.

…WOW. This turned out amazing and we will be adding it to our regular rotation of meals.  It required no chopping or prep work and was seriously restaurant quality (and even had some veggies for nutritional value, say what?).  If you want to impress some friends but are a little nervous to cook dinner – definitely try this one out. You can even add a nice chicken breast or some shrimp to fancy it up!

But really, go out and buy some gnocchi and make this tonight. You won’t regret it.

Sweet Creamy Gnocchi

Sweet Creamy Gnocchi

Sweet… Creamy… Gnocchi-y… Yummy!
  • Cook time – 15 minutes
  • Servings – 3-4 (but we were really hungry and ate it all in one sitting… oops)

Ingredients

  • 1 pound gnocchi
  • 1 cup frozen sweet corn
  • 1 cup frozen bell pepper mix (you can use fresh if you want!)
  • 3/4 cup half and half
  • 3 oz cream cheese, cut into little squares
  • Salt, pepper, garlic powder, dried herbs (basil, oregano, thyme)
  • 2-3 cups torn baby spinach (no stems!)

Protocol

1. Start the water and cook the gnocchi according to the package. Drain and do not rinse.

2. If you had time beforehand, set out your corn and peppers to thaw. If not (like us), steam or microwave them until warm.

3. For the sauce, combine the half and half, cream cheese, and seasonings in a saucepan. Eyeball the seasonings but don’t go overboard! You can always add more but you can’t take away. Heat over medium-low heat, stirring frequently until slightly thickened (6-7 minutes). Taste and adjust seasonings if necessary.

DSCN5489

4. Add the drained gnocchi back in the big pot and add the warm veggies.  Pour over the sauce and stir to combine.

DSCN5490

5. Stir in the spinach gently to not squish the gnocchi.

DSCN5494

6. Serve with some grated parmesan and enjoy!

Sweet Creamy Gnocchi - Cooking in College

-D&E

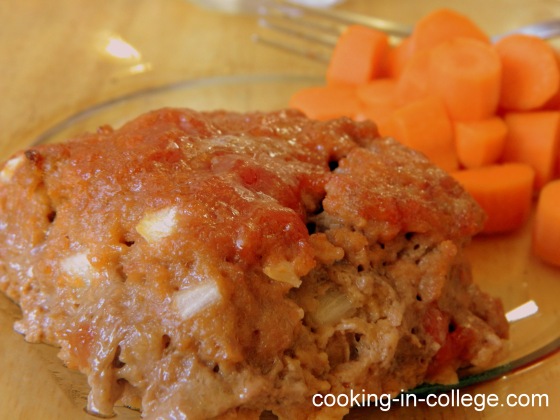
Cooking in College Meatloaf

You know what’s easy to do? Cooking meatloaf. You know what’s hard to do? Blogging about meatloaf. What are we supposed to say? It’s loafy, it’s meaty? We’re not exactly sure so we’re going to stick to the facts – It’s simple to make and it’s cheap to make.

Our method of making meatloaf is adapted from one of our cookbooks. We wish we could make our Moms’ versions of meatloaf but they are both reluctant to give out their recipes (one trick they use to get us to come visit them more – good homecooked meals!)

Anyway, we’re just going to dive right into this one. But here is one quick tip, there are countless ways to make meatloaf. You pretty much can’t go wrong if you stick to the basics. And since we are in college, this is our basic way to create a tasty meatloaf.


Meatloaf

It’s loafy, it’s meaty.
  • Servings – 6 mini loaves
  • Prep time – 10 minutes
  • Cook time – 20 minutes

Ingredients

  • 1/2 cup ketchup
  • 1/4 cup apple sauce
  • 2 tablespoons brown sugar
  • 1/2 cup pancake mix
  • 1/4 teaspoon pepper
  • 1 small onion finely chopped
  • 1 egg
  • 1.5 pounds of meat loaf mix (or 1 lb lean ground beef and 1/2 lb of ground pork)

Protocol

1. Heat your oven to 450º F.

2. In a mixing bowl, mix together ketchup, apple sauce and brown sugar together until evenly incorporated. Reserve on the side 1/4 cup of this sauce.

3. Mix in the rest of the ingredients in the mixing bowl with your hands. This will get messy.

4. When everything is incorporated nicely together, spray a 13×9 inch baking dish with cooking spray and place loaf in the center.

5. Still using your hand, work the loaf into an approximate 12×6 inch rectangle. Divide this into 6 equal size mini loaves using a spatula. Separate them to leave about 1/2 an inch between them.

6. Brush onto the mini loaves the remaining 1/4 cup of the sauce from Step 2. If you want more, just mix together more ketchup and brown sugar.

7. Place baking dish into the oven and cook for 18 minutes and let stand for 2 minutes before serving.

8. Serve with a side of veggies and enjoy!

-D&E

P.S. – Do you have a special way or “ingredient” that you use in your meatloaf? If so, share it in the comments below!

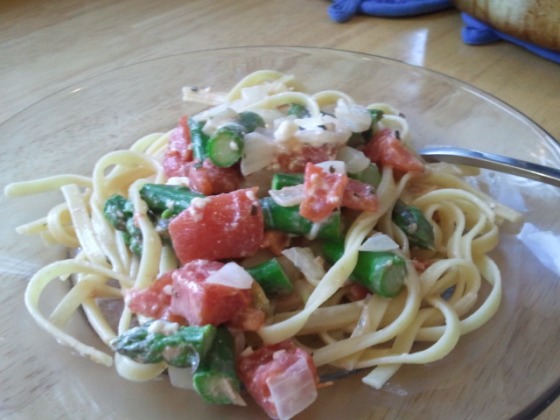
Asparagus and Tomato Pasta

Yes we are already putting you to the test to make sure you paid attention to Tuesday’s post! This is our first pasta recipe and you better be ready, because it is not your traditional red sauce and spaghetti. “But D&E, I’m only in college, I thought tomato sauce from a jar would be okay to make?” We only have one quip with tomato sauce from jars…or maybe two or three:

  • Why pay the $4?
  • You can easily make your own – with more nutritional value
  • They just don’t taste good as homemade!

Okay we are done quipping for now. The point we are trying to make is that although you are in college, you can still make a fantastic meal instead of always buying one in a jar, or in a can, or in a box. But don’t worry, we’ll start you off easy with this more original pasta recipe.

Oh, and one more thing (promise it is not a quip) – don’t be afraid of asparagus! It really is delicious and easy to incorporate into a lot of recipes (hint: this won’t be the last time you see it on this blog!).

Asparagus and Tomato Pasta

If you haven’t tried asparagus yet, or you have and didn’t like it, this is the perfect recipe to try (or re-try) it! With so many flavors and textures you won’t even know it’s even there. AWKWARD DISCLAIMER: Asparagus can make your pee smell funny…just wanted to give you a heads up since we were confused when it happened to us.
  • Servings – 3 to 4
  • Prep time – 10 minutes
  • Cook time – 10 to 12 minutes

Ingredients

  • 1/2 pound of your favorite pasta
  • 1 pound fresh asparagus stalks
  • 1 can (15 ounces) crushed tomatoes
  • 4 ounces of crumbled Gorgonzola or grated Parmesan cheese
  • 2 tablespoons olive oil
  • 1 medium onion, diced
  • 2 teaspoons dried parsley
  • 1 teaspoon dried basil
  • 1 clove garlic, finely chopped

Protocol

1. Start the water for the pasta.

2. Rinse the asparagus under cool water and break off the bottom third of the stalk. If you bend the stalk, it will naturally break off where it needs to. Discard the bottom portion.

3. Cut the asparagus stalks into 1 inch pieces.

4. After the water is boiling and you’ve added a pinch of salt, add the pasta to the pot.

5. When there is 5 minutes left cooking the pasta, add the asparagus to the water. For example, we used fettuccine which has a cooking time of 12 minutes according to the box; so, we added the asparagus after 7 minutes of cooking.

6. Drain the pasta and asparagus after the allotted time and set aside. Do not rinse.

7. Heat the olive oil over medium heat in a large sauce pan. Add the diced onion and garlic and saute for 2 minutes.

8. Drain the can of tomatoes and add to the sauce pan as well as the basil and parsley. Heat for 1-2 minutes.

9. Add the asparagus and pasta and cheese to the pan and stir to get everything incorporated.

10. Enjoy!

Let us know how this recipe went and if you have any suggestions, leave them in the comments below!

-D&E

Pasta Perfection

There are plenty of myths out there on how to properly cook pasta such as adding olive oil to the boiling water, rinsing the pasta after you cook it, or speaking to the pasta with an Italian accent as it cooks. “D&E, how hard can cooking pasta be?” You’d be surprised at how many people still have trouble with cooking pasta (it took Declan months to master it – probably because he is Irish and not Italian). But once you properly learn to cook pasta, you will go far in life…or just in the kitchen.

Step 1 – Measure out the water. The perfect water to pasta ratio is 1 gallon (16 cups) of water for every 1 pound of pasta. Too much water will take too long to boil and too little water will cause the pasta to clump.

Step 2 – Add COLD water to the pot. Hot sink water will contain more impurities than cold sink water. Use a big enough pot that will hold the water and pasta. Make sure it has a large base so that the water will boil faster. This is a pretty easy step.

Step 3 – Bring the water to a fast, raging boil. Also, add a little bit of salt to the water (about 1-2 tablespoons) but don’t add any olive oil! This will season the pasta as well as quicken the time for the water to boil.

Step 4 – Add the pasta to the water and do NOT cover with a lid. Also, do not add the pasta until Step 3 is reached and make sure the water is back to boiling after the pasta is added. Start your timer after the water reaches a boil again.

Step 5 – After 1 minute, give the pasta a stir. After that leave it alone!

Step 6 – Test your pasta after 4 minutes. The proper amount of time it takes to cook pasta “al dente,” or tender but firm, varies for all the different types of pastas. So keep testing your pasta every minute from here on out. The entire time to cook should probably it between 8 to 12 minutes.

Step 7 – Once the pasta is “al dente,” remove it from the heat and drain it immediately into a colander to stop the cooking process. If you wait too long, your pasta will over cook and become too mushy. If for some strange, unforeseen reason, you can’t immediately do this, add about 1/2 to 1 cup of cold water to the pot. This will lower the temperature enough to stop the cooking.

Step 8 – Don’t over drain the pasta, it should still remain moist. Also, NEVER RINSE OFF THE PASTA! Unless the recipe calls for it. After you have drained the pasta, return it to the pot or a pan and add whatever sauce you made to it. This will keep the pasta from sticking together.

Step 9 – Enjoy.

As you can see, cooking pasta is very time sensitive. But, if you remain patient and diligent during the process, you will cook perfect pasta and impress your friends and family! If you have any more questions, email us at declanandericacook@gmail.com or visit this link for more help.

-D&E

Preventing Food Poisoning

Do you remember how adamant we were about having a fire extinguisher on hand? Well, we have just realized that we have another important topic that we are just as adamant about: food safety.

Did you know that an average of 5,000 college kids a year get sick from food poisoning because they read cooking blogs that don’t stress the importance of food safety? Did you also know that 76% of statistics are made up on the spot?

Okay, we’ll tone down the humor now because this does need to be taken seriously. We have a set of easy rules to follow to ensure that we never get sick from our cooking and we want to share these with you.

The D&E Easy to Follow Food Safety Rules

1. Always have a fire extinguisher on hand in the kitchen. Because the worst kind of food poisoning is BEING ON FIRE!!!

2. Use one cutting board for meats, poultry, fish etc. (pretty much for anything that use to poop) and use one cutting board for everything else such as veggies, bread, herbs, etc. (anything that couldn’t poop). Make sure these are clearly marked to designate their difference. We use a red cutting board for our meats and a black one for everything else. Do not use a wooden board for meats.

3. Wash your hands after handling meats or eggs, wash your produce before you cut it, and wash your freaking dishes and utensils! Use hot, anti-bacterial-soapy water.

4. Divide your leftovers into small portions and store them in the fridge or freezer. This will ensure that the food cools down faster so that those pesky bacteria don’t grow. Also, reserve a special area in the fridge for meats, away from any food that won’t be cooked before eaten.

5. Thoroughly cook your food. With a thermometer (yes, go get one) insert into the thickets part of your food. Check this website for specifics.

6. Do not thaw food on the counter at room temperature. Thaw in the fridge or check the FAQ page for our favorite method.

7. After you are done cooking, clean up right away. Pans, counter tops, table, EVERYTHING! A clean kitchen is a happy kitchen.

Well that is about all we have. We’ve posted some links below that are also helpful, so take a look at them as well. And if we hear any of you whining about these rules, we will send Jack Bauer after you!

www.foodpoisoningtreatment.org/food-poisoning-treatment-tips-to-prevent-food-poisoning

www.asbestosincancer.com/12-tips-prevent-food-poisoning/

www.webmd.com/food-recipes/food-poisoning/preventing-food-poisoning

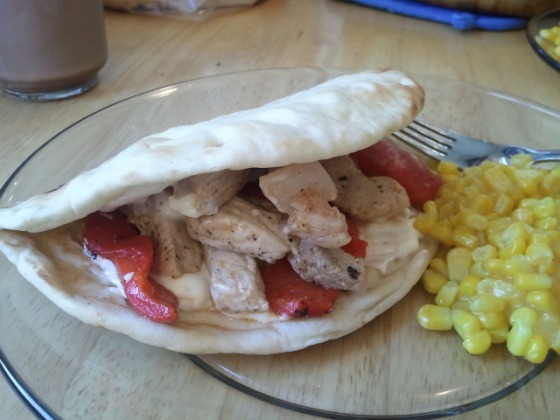
Peter Picked Peppered Pork Pitas

Try saying that tongue-twister ten times in a row. Today’s recipe was passed down to us from a little old lady from the Greek Isles…just kidding we found it in one of our cookbooks. “Hey, what’s the deal here, I thought there was going to be a theme for this week? You started Monday with Mexican food, but now Greek food?”

Stout observation, but no, the theme for this week is not Mexican food. It’s actually “Stuff-You-Cook-In-A-Pan-And-Serve-On-Edible-Circles” Week, and you thought we were your typical cooking blog! Come on, we’re way more original than you think.

 So for this week we are introducing you to a recipe that is very quick to make and as always, delicious!

Peppered Pork Pitas 

You can really impress your friends and family with this easy and oh-so-tasty meal. Although you can probably roast your own red peppers, we think it is easier (and way more convenient) to just buy a jar from your favorite grocery store.  They run about $3 a jar.
  • Servings – 3 to 4
  • Prep time – 10 minutes
  • Cook time – 10 minutes

 Ingredients

  • 1 pound of pork chops
  • 7 oz jar of roasted red peppers (we buy a 12oz jar, use half, and keep the rest for quick and yummy pasta and pizza toppings)
  • 3-4 pitas
  • 1/3 cup of mayonnaise (use light or low-fat!)
  • 2 tablespoons of milk
  • 2 cloves of finely minced/chopped garlic
  • Salt
  • Pepper
  • Olive oil

Protocol

1. Cut your pork chops into slices (finger-thick).

2. Drizzle a little bit of olive oil over the slices, just enough to coat, and season with salt and pepper.

3. Over medium heat, cook the pork slices in the pan for about 5-6 minutes, until pork is no longer pink in the middle. While pork is cooking, drain the peppers and cut into strips.

4. Once pork is cooked through, pour in the roasted red peppers and cook over medium-low heat until the peppers are hot.

5. While this is heating, combine mayo, milk, and garlic into a bowl and mix together in a bowl until everything is incorporated. 

6. On a pita loaf, serve the roasted red peppers and pork and drizzle with the garlic mayo cream. Serve with a side of veggies (we had corn on hand) and enjoy!

Let us know how it went and if you have any suggestions in the comments below!

-D&E

Mexican Monday, Monday!

“Uhh, D&E why did you start off this week with that?!” Well, aside from our obsession of the 1960’s , it’s a hint of where we are going for vacation this summer…that’s right we’re going to CALIFORNIA! We are so excited! For one, we get to visit Declan’s family and for two we get to eat our favorite food in the world…MEXICAN!

Since our trip is still 65 days away, we just have to share our favorite meal with you, FAJITAS! No joke, this meal has been our staple for the past year… actually it’s the first meal we ever cooked together! So without further ado…

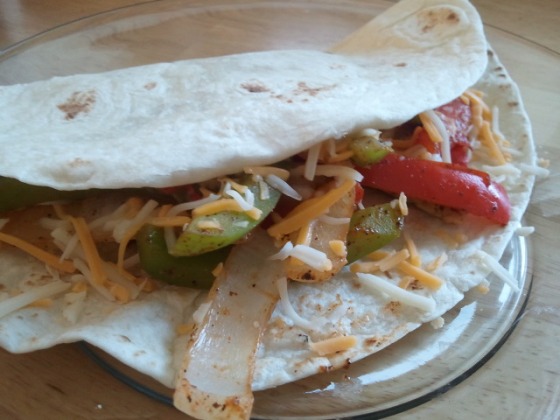
Fajitas

Extremely versatile meal that can easily exclude the chicken to become a vegetarian meal or substitute the chicken for steak (but we’re in college so…) If you haven’t bought fajita seasoning from Penzey’s yet you can always buy a small packet from your local grocery store to make sure you actually like it first.
  • Servings – 3 to 4
  • Prep time – 5 minutes
  • Cook time – 10 -15 minutes

Ingredients

  • 2 thawed boneless chicken breasts
  • Pack of flour tortillas
  • 1/2 green pepper
  • 1/2 red pepper
  • 1 small onion
  • Fajita seasoning
  • 1 can of re-fried beans*
  • Sour cream*
  • Mexican cheese*

(*optional)

Protocol

1. Cut your chicken into “french fry” like strips…or any shape you desire but the longer and slimmer they are, the faster they’ll cook.

2. Cut both peppers into long strips as well, again refer to this video for tips on cutting peppers.

3. Slice your onion into half-arcs like we did in the Balsamic Braised Chicken recipe.

4. Over medium to high heat, brown your chicken strips for 2-3 minutes a side or until evenly cooked.

5. Throw in your peppers and onion into the pan, cook until tender. Tip: add a little bit of water to the pan to give the veggies a little steam.

6. Add the fajita seasoning to your desirable amount, everything in the pan should be coated evenly. 

7. If you want to be somewhat authentic, heat up a can of re-fried beans. Refer to the instructions on the can. Oh and make sure to wear a sombrero during this step, it’s extremely important.

8. Serve with sour cream and cheese on a flour (or corn) tortilla and enjoy!

Let us know how it went!

-D&E