Vegetable Pancakes

“Huh? What the heck are vegetable pancakes?” you are probably thinking. Don’t worry we’ll get to them in just a moment.

How is everyone?! We haven’t posted in awhile, but summer break is going by so fast that we hardly noticed that it’s been three weeks since our last post. We missed you too.

We’ve been up to a lot, refurnishing chairs, decorating our new home, going to see Of Monsters and Men, amusement parks, baseball games, the list goes on and on. We also had the chance to get to know our neighbors a bit better. As it turns out, one of them writes a food blog as well! It’s called bingepittsburgh.com and he reviews restaurants and other establishments in and around Pittsburgh. You should totally check it out even if you don’t live in Pittsburgh, he has some other really great posts.

“Okay that is great and all, but what about these vegetable pancakes?” you definitely are thinking by now. Alright, you win.

To be completely honest, we aren’t the best at planning ahead when it comes to meals. We make a grocery list and all but when we shop we usually buy a little extra than we need. At the end of the week we are always left with a handful of vegetables, meats, pasta, etc. that we have no idea what to do with. Luckily Erica is quick on her feet (not literally, just figuratively – she’s actually quite clumsy) and always comes up with a great solution in the end.

A few weeks back we had in our fridge and pantry – a couple potatoes, some carrots, zucchini, and eggs. Erica remembered that we made latkes awhile back and thought that the same could be done with the vegetables we had on hand. Voila – vegetable pancakes were born. (Also, thanks Sandy for the inspiration!)

Veggie Pancakes

Print this recipe!

Veggies are still good for you if they’re fried, right?
  • Servings – 3-4
  • Prep time – 15 minutes
  • Cook time – 10 minutes

Ingredients

  • 1 medium zucchini
  • 1 medium carrot
  • 1 cup of shredded potatoes (you can use frozen or one large russet)
  • 2 green onions, chopped
  • 1 egg
  • 2 tablespoons flour
  • 1 teaspoon salt
  • 1/2 teaspoon pepper
  • 1/2 teaspoon of whatever dried herb you like (or about 1 tablespoon of fresh)
  • Vegetable or canola oil

Protocol

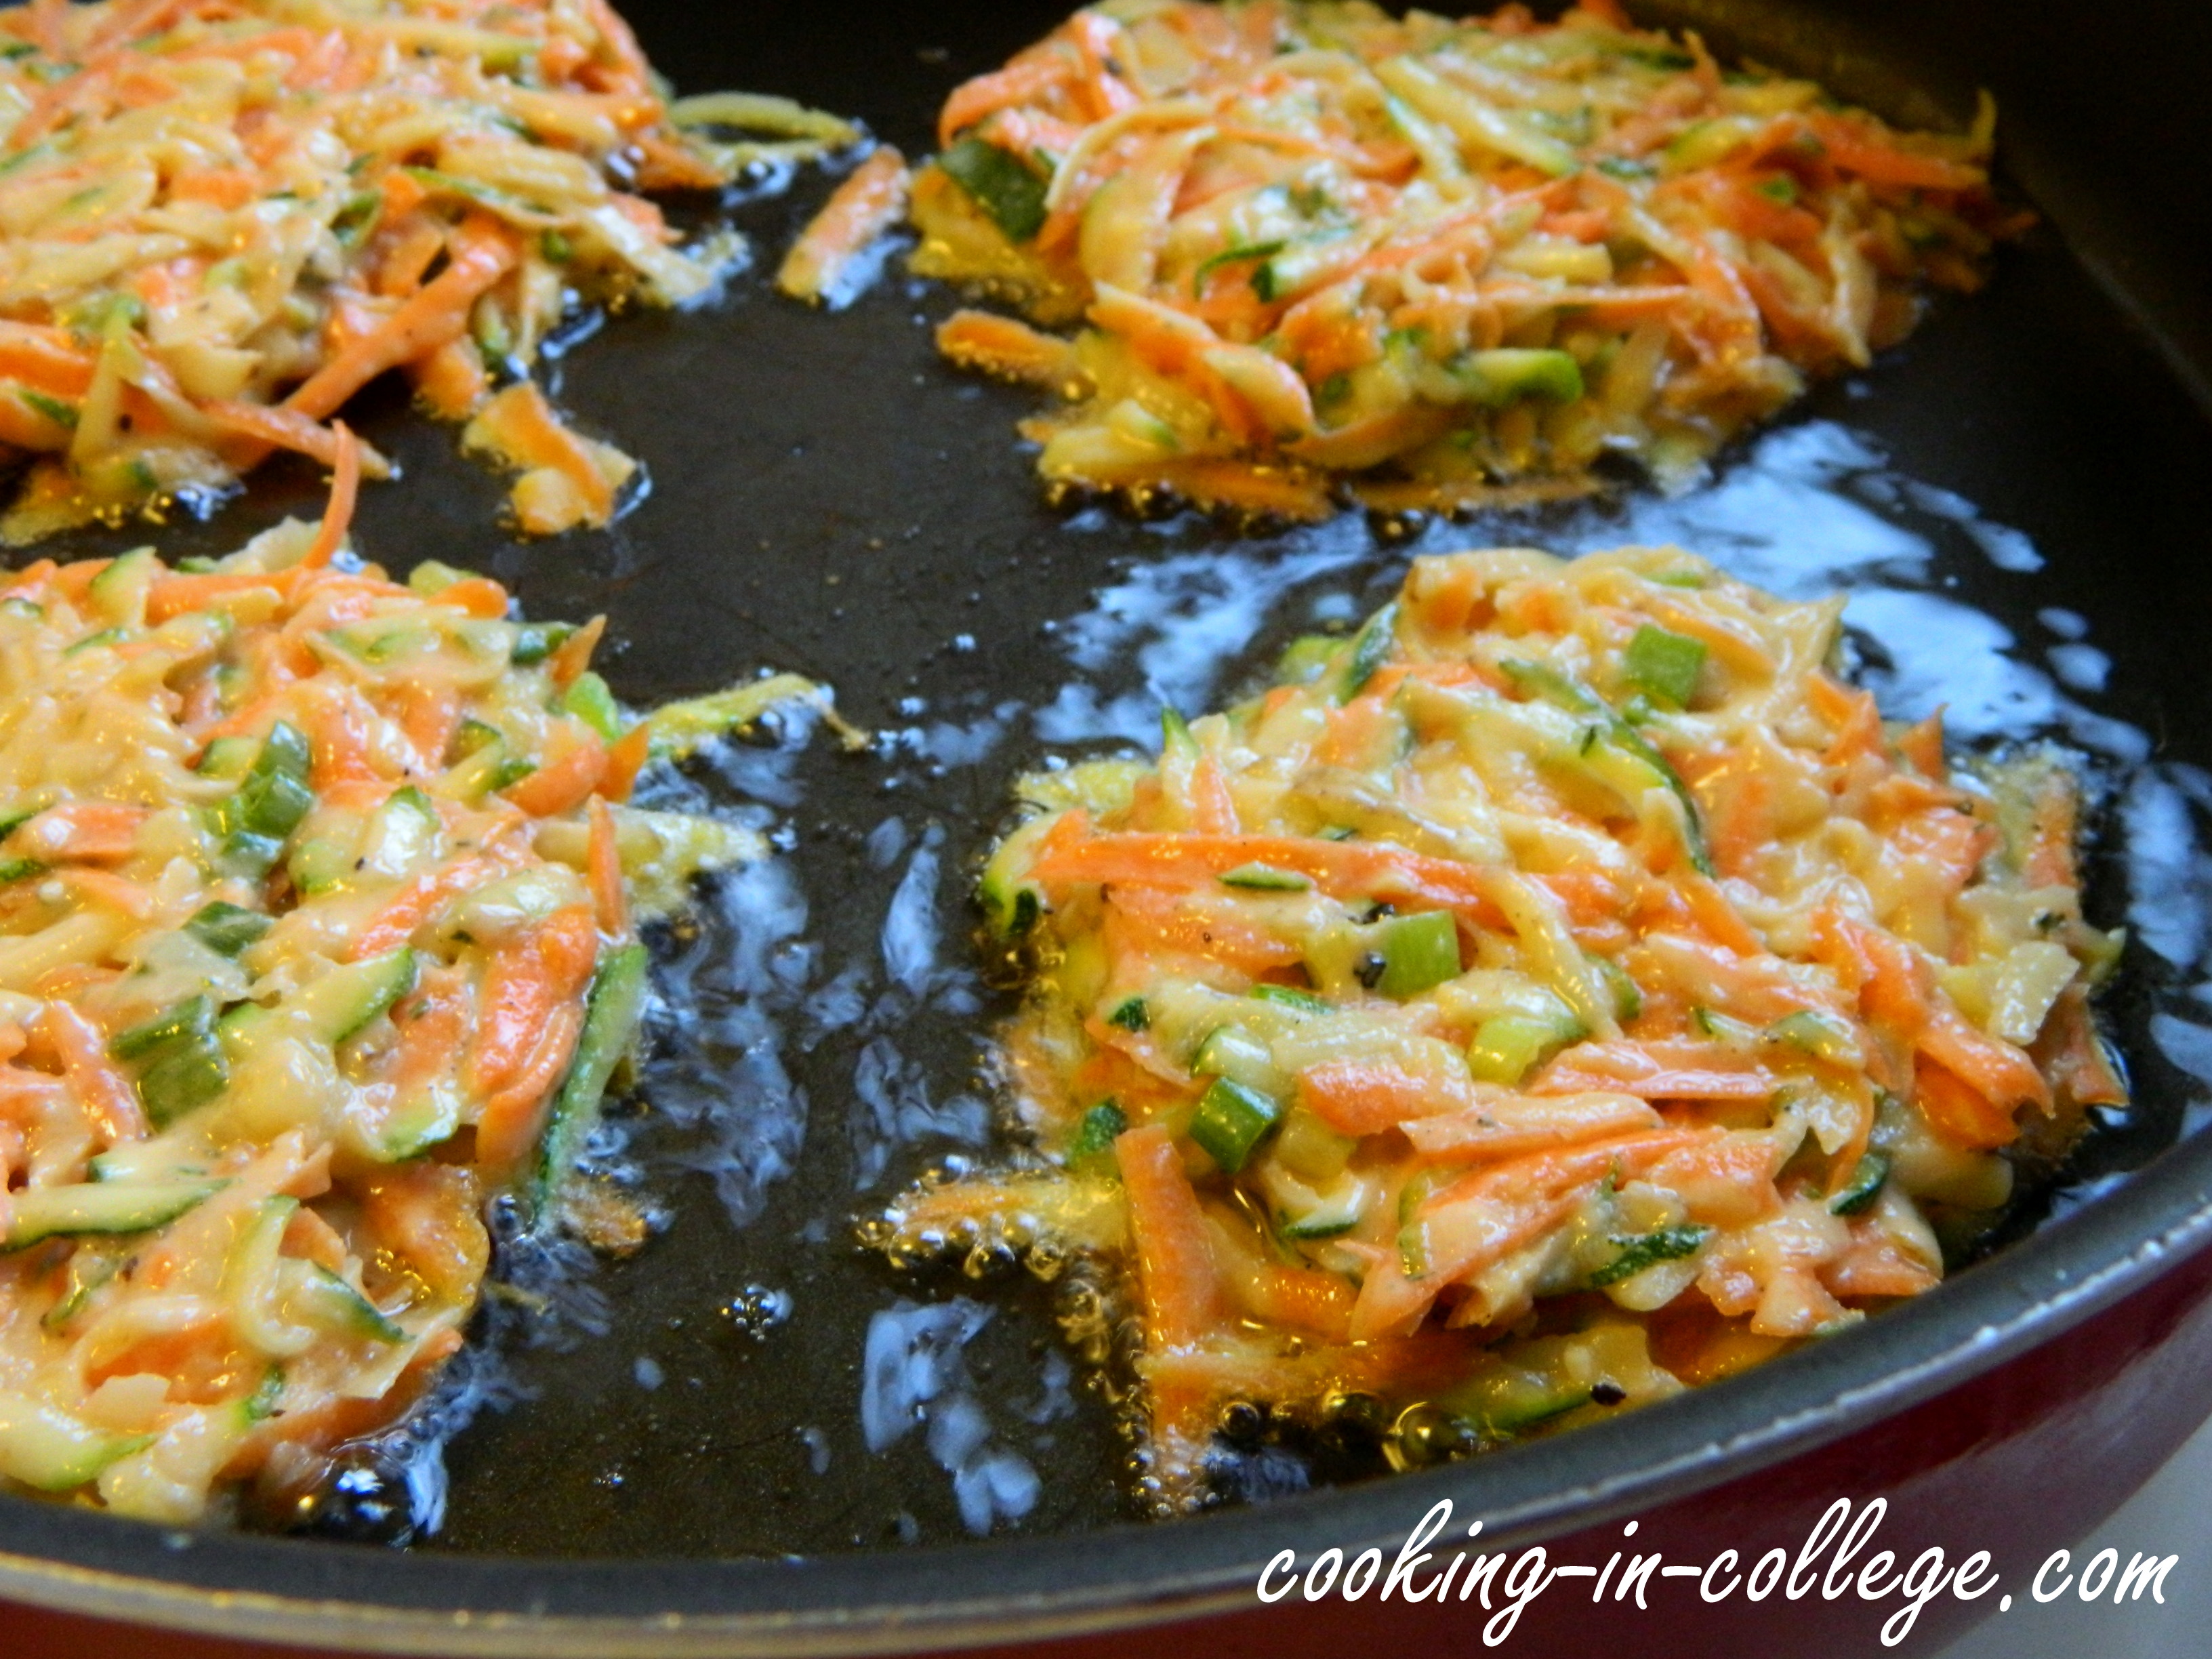
1. Shred all your veggies using a grater. This actually didn’t take very long and was really easy to use.

2. Combine all the ingredients except the oil in a large mixing bowl and mix well. If it’s still pretty wet and doesn’t stick together, add a little bit of flour at a time until the mixture can stick together fairly well (we’re not looking to form balls or anything, just patties).

Double yolk!

Double yolk!

DSCN6078

3. Add enough oil to the pan to make it 1/4 inch deep. Heat over medium-high heat.

4. When your oil is hot enough, form thick patties and carefully place them in the hot oil. If it doesn’t immediately start to sputter, the oil isn’t hot enough. Use a spatula and gently press down on the patties to flatten them out more. We could fit about 4 in the pan at a time.

DSCN6080

5. Fry for 3-4 minutes per side, or until golden brown. Remove to a paper towel-lined plate and sprinkle with a little more salt immediately. You’ll most likely have enough for a second batch, depending on how big you made your first patties.

DSCN6083

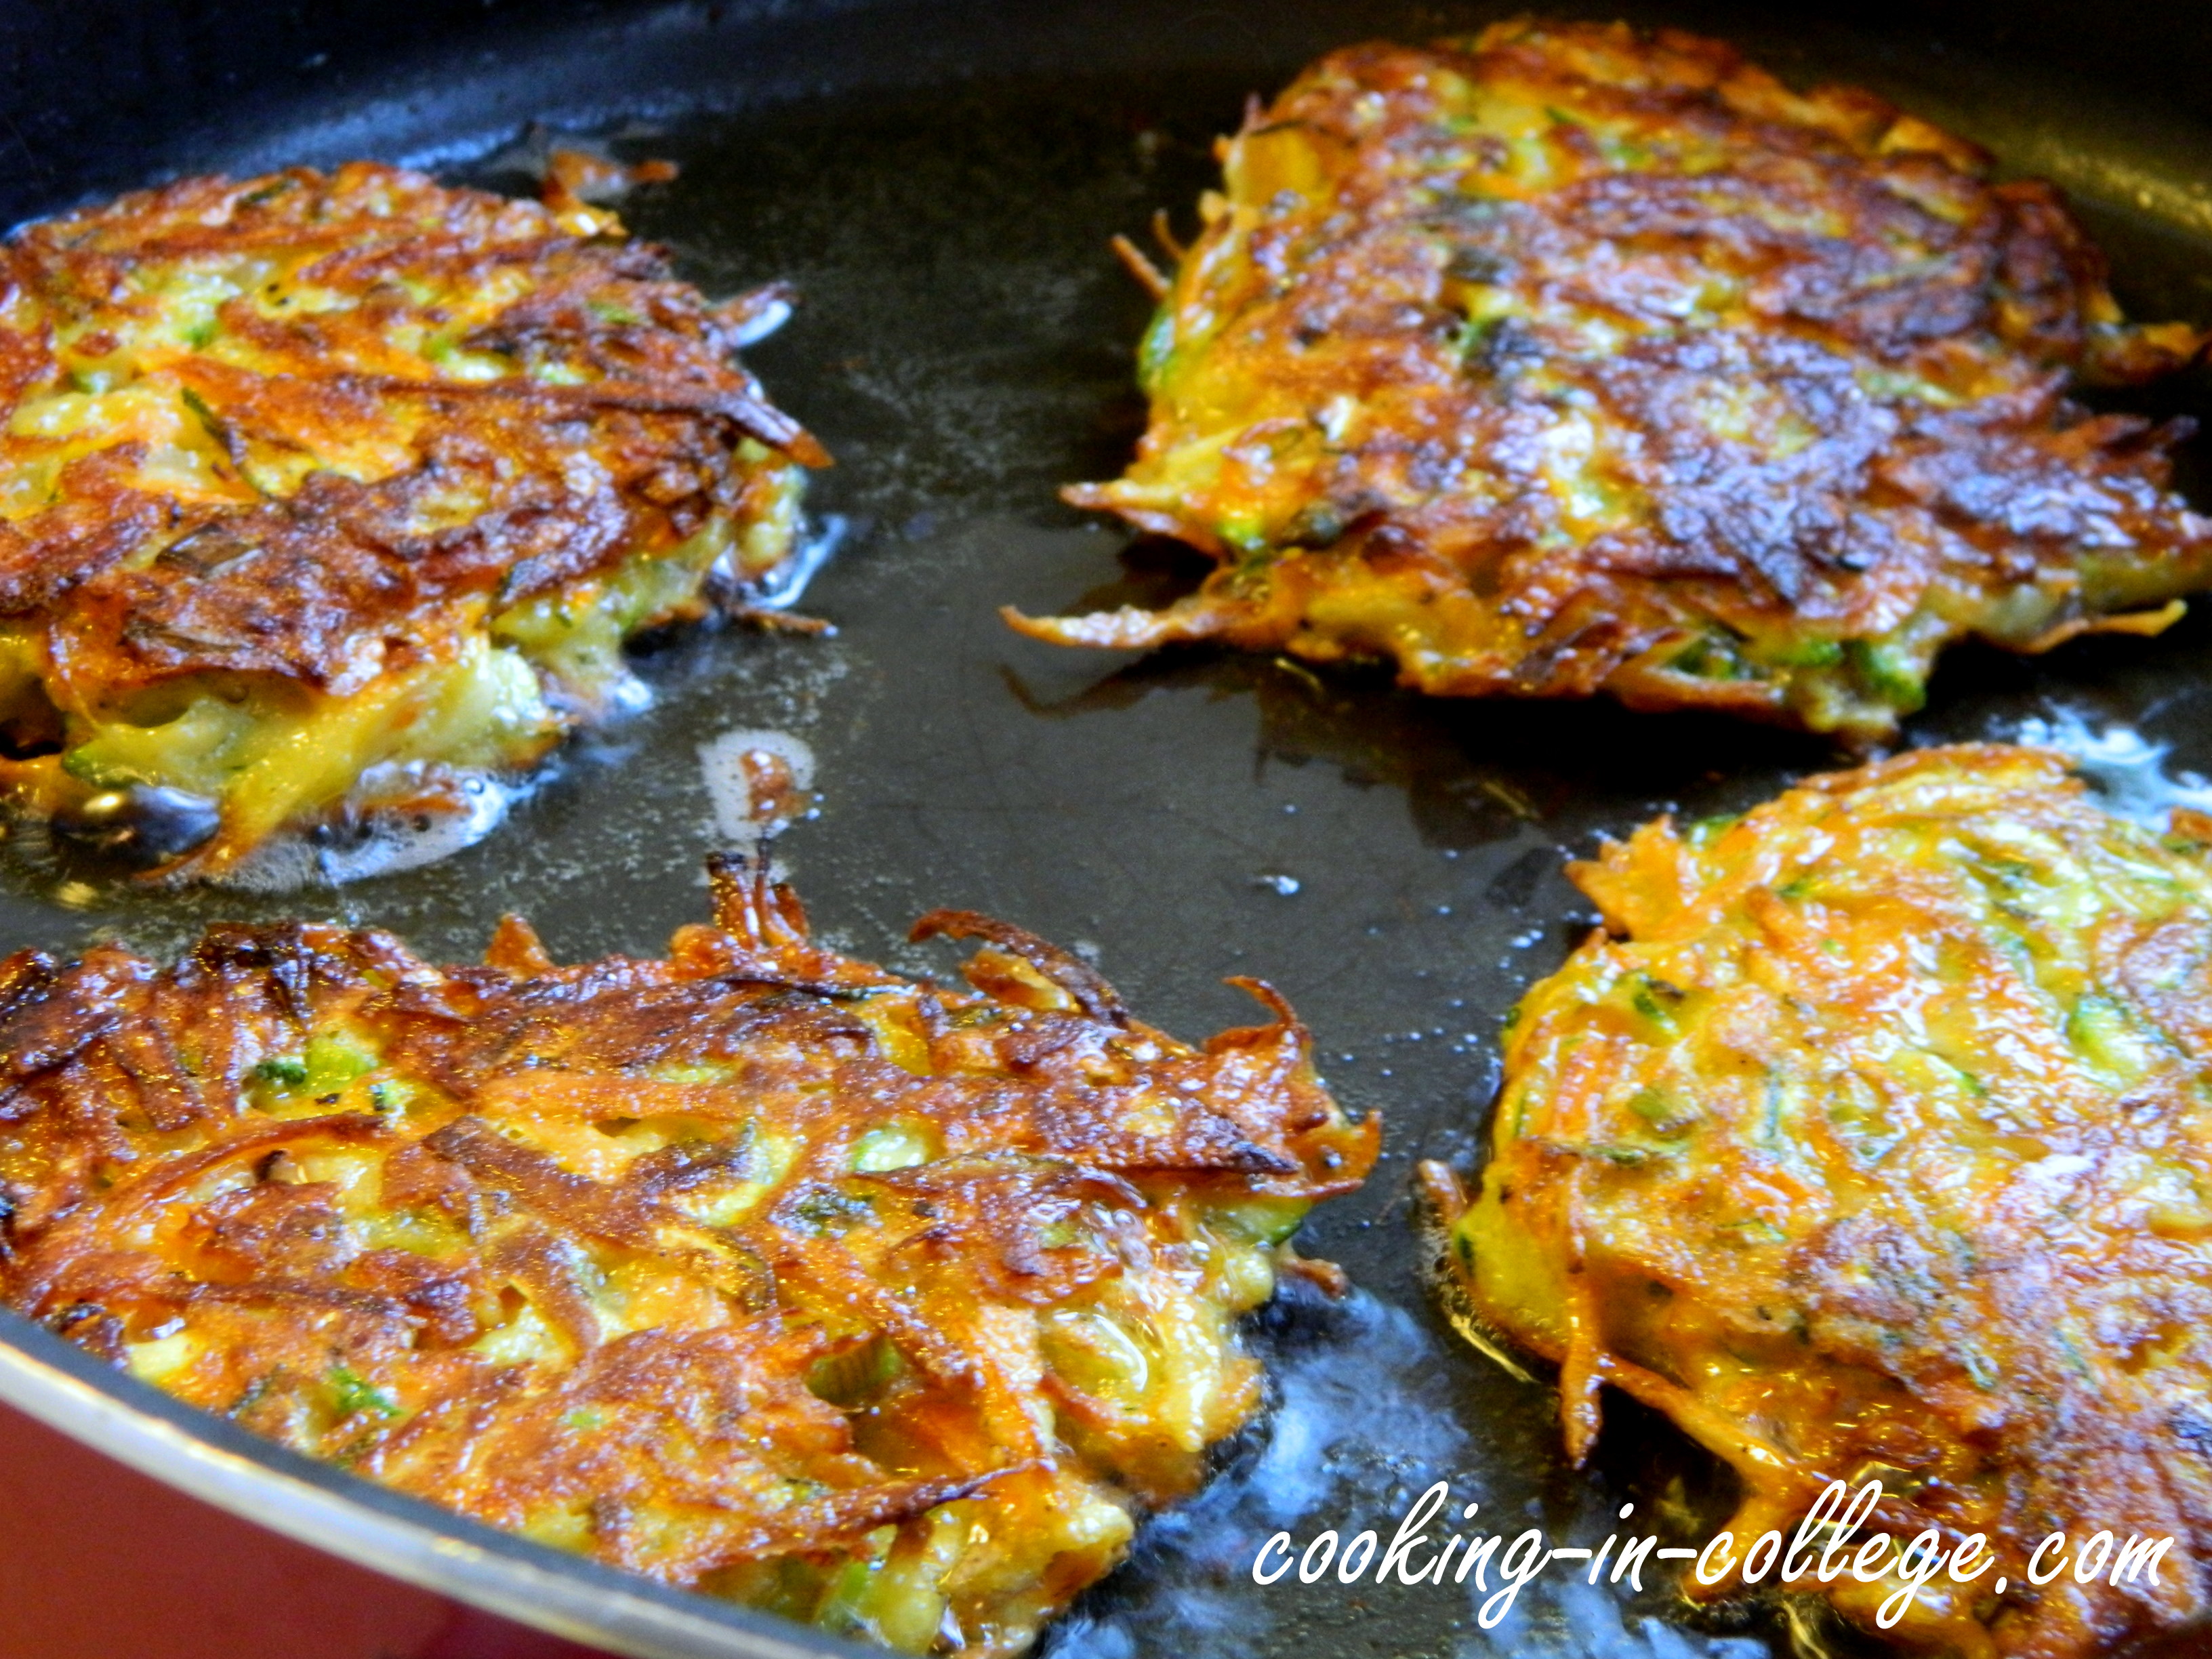
6. Serve as a yummy side or just on their own and enjoy!

DSCN6089

-D&E


The Best Pizza Dough You’ll Ever Make

So even though we have finally moved away from the college campus we seem to be reverting back to our old college ways by eating pizza  at least once a week. Correction, homemade pizza of course (okay second correction, there might have been this one time we ordered pizza but that is neither here nor there)!

It’s not that we are getting lazy and don’t feel like cooking some nights (although this does happen every once and awhile); we started to make more pizzas because we found the best recipe for homemade dough. This recipe came in a book that came with our KitchenAid stand mixer. Although we have the technology to create this dough in four minutes, it is easily adaptable to make it the old fashion way – by hand.

We also added a little bonus recipe at the end of this post for one of our favorite pizzas to make – BBQ chicken. If you have any questions don’t hesitate to reach out to us on twitter (@cook_in_college).

Oh and two other random things we forgot to mention:

1. Last week was our 2 year blogiversary and we totally forgot! Hopefully the same doesn’t happen on our first wedding anniversary.

2. We were featured in a Pittsburgh magazine this past week, “Edible Allegheny” (pronounced Allie-gain-ee). Here is a link to the online issue, we are on page 14 of the magazine. We are super pumped so please check it out and let us know what you think!

Pizza Dough

Print this recipe!

It’s not delivery, it’s not even Digiorno, it’s Cooking in College!
  • Servings – 1 ball o’ dough
  • Prep time – 5 minutes
  • Wait time – 1 hour

Ingredients

  • 1 packet of active dry yeast
  • 1 cup warm water (105 to 115F)
  • 1/2 teaspoon salt
  • 2 teaspoons olive oil
  • 2.5 cups of all-purpose flour

Protocol

1. In a mixer bowl, dissolve your yeast in the water and add in the salt and olive oil.

2. Mix in the 2.5 cups of flour and turn on your stand mixer to speed 2 for 4 minutes (or mix the dough in the bowl with your hands and transfer to a floured surface to knead for 5 to 7 minutes).

3. Place the dough in a greased bowl and let rise for one hour or until it doubles. Punch it down when it is finished rising.

Before Rising

Before Rising

Doubled in Size

Homemade Pizza Dough - Cooking in College

For bonus recipe see below…

A little further down…

Warmer…

Almost there…

Here! Okay so you got the dough now what? Well, heat your oven to 450F. Sprinkle some cornmeal over a pizza stone and evenly spread out the dough. Bake for an initial 5 minutes. Remove from the oven and top with your favorite toppings. We like to add BBQ sauce, sauteed chicken, some corn, green onions, and mozzarella cheese. Bake for another 12-15 minutes or until crust is golden brown. Serve and enjoy!

BBQ Chicken Pizza - Cooking in College

Perfect Brownies

So now that we’re all moved into our new place, we’ve finally gotten settled enough to start decorating! So far we’ve painted the fireplace, bought a new couch (finally!), and started hanging pictures on the walls. Next step that we plan to do this weekend: paint the walls! We’re super excited because this is the first place we’ve been able to actually paint! When we’re all finished, we’ll be sure to share pictures because obviously everyone in the whole world is interested in our new house.

Now for this recipe, we discovered it when someone (coughDeclancough) forgot to buy brownie mix at the store when we were planning on making a quick dessert when having someone over for dinner. Someone else (coughEricacough) was quick on her feet and found a great recipe online with easy ingredients. We made these a second time and adjusted a few things and they are really the best brownies we’ve ever had. We’re making them for the third time in three weeks this weekend for Declan’s sister’s high school graduation party! They’re that good!

P.S. We made these for a 9×13 pan but you can easily halve the recipe and make it in a 9×9 or 8×8 pan, just watch the cooking time and check on them often! Tip: A half of 3/4 cocoa is a heaping 1/3 cup.

Perfect Brownies

Print this recipe!

Chocolate heaven in rectangle shapes
  • Servings – 12 large brownies
  • Prep time – 10 minutes
  • Bake time – 20 minutes

Ingredients

  • 1 cup melted butter (2 sticks; you could use vegetable oil here, but come on. Brownies are supposed to be unhealthy.)
  • 1 cup white sugar
  • 1 cup brown sugar
  • 2 teaspoons vanilla extract
  • 4 eggs
  • 1 cup flour
  • 3/4 cup cocoa (the better quality you use, the better these will be!)
  • 1/2 teaspoon baking powder (different than baking soda!!)
  • 1/2 teaspoon salt
  • 1 cup chocolate chips or nuts (optional)

Protocol

1. Preheat your oven to 350F. Grease your baking pan well to make sure the brownies don’t stick.

2. In a large bowl, mix the sugars, vanilla, and butter. Beat in your eggs and make sure everything is mixed evenly.

3. In a separate bowl, combine the flour, cocoa, baking powder, and salt.

Yum cocoa

DSCN6040

4. Gradually stir the dry mixture into the egg mixture, stirring thoroughly after each addition. Stir in any extras after everything is combined.

5. Pour into your greased baking dish and bake for 20-25 minutes or until a toothpick comes out clean when inserted.

DSCN6045

6. Cut into (large) brownies and enjoy warm with a cold glass of milk!

Brownies - Cooking in College

-D&E

Slow Cooker Ribs

To get you prepared for Memorial day we are posting some classic American meals this week! First up: ribs.

You might say to yourself, “Okay D&E were still in college, how the heck can we afford to buy ribs let alone wait around 8 hours for it to cook?!” Granted this is what Erica thought after Declan came home from grocery shopping all by himself with a large rack of ribs. Nevertheless, Declan insisted that he had a plan (he didn’t at the time but would later Google “what to do with ribs?”)

Enough with the anecdote, we found an insanely easy slow cooker recipe for ribs. As you can see in the recipe below we kept it really simple – just a few spices for the dry rub and then our favorite BBQ sauce. Feel free to doctor it up. And if you have any great tips please share them!

Oh and did we mention these ribs cost $10? That’s half of what you would pay at a restaurant!

Slow Cooker Ribs

Print this recipe!

Honestly, it’s like magic: Put stuff in slow cooker, wait, eat delicious ribs.
  • Servings – 3 to 4
  • Prep time – 10 minutes
  • Cook time – 8 hours

Ingredients

  • 3 pound rack of ribs
  • Salt
  • Pepper
  • Cayenne pepper
  • Garlic powder
  • 12 ounces of your favorite BBQ sauce

Protocol

1. Cut your rack of ribs in half so that they will easily fit into your slow cooker.

2. Season with salt, pepper, cayenne, and garlic powder (we didn’t measure, instead we just eyeballed it).

Not too much seasoniong

3. Place the ribs in the slow cooker (we placed ours one on top of the other)  and douse with the BBQ sauce.

Saucy!

4. Set the slow cooker to low and cook for 8 hours.

5. Serve with some mac and cheese and enjoy!

Cooking in College - Slow Cooker Ribs

-D&E

Chicken Mole

Whew. Between graduating, packing, moving across town, unpacking, and Erica starting a new job, we’ve been pretty busy. Taking time to cook has been our goal the last few days (we just moved on Saturday and have been slowly unpacking into our slightly smaller kitchen) and we finally succeeded!

Now, being super hungry and not very patient, we apologize for the pictures – if and when we make this again, we’ll be sure to post some better ones 🙂 It was just so good we had to share it with you!

Chicken Mole

Print this recipe!

Did you know that at any minute you are only 15 minutes away from a delicious, authentic Mexican dish?
  • Servings – 3 to 4
  • Prep time – 5 minutes
  • Cook time – 10 minutes

Ingredients

  • 1 small bell pepper, chopped small (any color; or any other vegetable you want!)
  • 2 cups cooked, shredded chickenDSCN6016
  • 1 small onion, diced
  • 3 cloves of garlic, minced
  • 1.5 tablespoon unsweetened cocoa powder
  • 1/2 tablespoon ground cumin
  • 1 teaspoon paprika
  • 1 teaspoon chili powder
  • Sprinkle of cinnamon (eyeball this – maybe around 1/4 teaspoon?)
  • 1 can condensed tomato soup (what we had, we’re sure tomato sauce would work too, it just won’t be as thick)
  • 1/4 cup chopped cilantro

Protocol

1. Heat a small amount of olive oil in a small skillet and saute the bell pepper (or whatever veggie) until tender. Set aside.

2. Meanwhile, in a medium sauce pan, saute the onion in some olive oil for 3 minutes. Add the garlic and continue to cook until the onion is translucent.

3. Stir in the tomato soup, cocoa, cumin, paprika, cinnamon, and chili powder. Taste and add any salt, pepper, and/or more spice if needed. Heat over medium-low until simmering.

DSCN6010

4. Stir in the pepper and shredded chicken. If the sauce is too thick, stir in a tablespoon or so of water until it reaches the desired thickness. Heat until everything is combined and heated through.

DSCN6014

5. Lastly, stir in the cilantro right before serving. Serve in tortillas or over rice, and enjoy!

DSCN6020

-D&E

P.S. Happy 18th birthday to Erica’s favoritest brother, Zack!!

Paris Inspired Creamy Leeks

So when we were in Paris over Christmas, we discovered the most amazing vegetable – the leek. Now, we had had leeks in dishes  or soups before, but they never really stood out to us.  Until. One of the best side dishes ever.  Plain old creamed leeks. Nothing fancy, just absolutely delicious.  We’ve tried to make them at home and this is the closest we’ve gotten to the true French dish.

If you’ve never had leeks before, they’re in the same family as onions and garlic and are very mild in flavor.  Because they have so many leaves and layers, use this video to learn how to properly clean and chop a leek. Trust us – it’s not hard and it’s totally worth it.

Creamy Leeks

Print this recipe!

Simple French cuisine!
  • Servings – 3-4
  • Prep time – 5 minutes
  • Cook time – 10 minutes

Ingredients

  • 2 leeks
  • 1 tablespoon butter
  • 1/4 cup water
  • 1/3 cup half and half
  • 1 tablespoon grated parmesan (optional but totally worth it)
  • Salt and pepper

Protocol

1. Clean and chop your leeks.  Watch the video (linked above) if you’ve never done this.

DSCN5870

2. In a non-stick pan, melt your butter over medium heat. Add the leaks, water, and a pinch each of salt and pepper. Cover and reduce heat to low. Cook for about 10 minutes or until the leeks are soft.

3. Stir in the cream and parmesan and cook for another minute or so to let everything come together. If you want the sauce to be thicker, cook for longer.

4. Serve and enjoy!

Creamy Leeks - Cooking in College

-D&E

Herbed Pork Tenderloin

Oh hello there! Miss us? Sorry we haven’t posted in 2 weeks; last week was our birthday week so we decided to take a break and this week we have been incredibly busy – registering our car in Pennsylvania (yes, Erica is an official PA resident now!) and figuring out our moving situation (two weeks until we move away from campus to a cute Pittsburgh suburb!). Finally, Erica had a couple tests to study for.

DSCN5862

Alright, enough whining. Declan went grocery shopping this week, by himself, without a list. Usually this turns out to be a disaster, however something caught his eye that he couldn’t resist to buy – a $5 pork tenderloin. We’ve never cooked pork tenderloin before but it was cheap and a whole pound so Declan picked it up. We did some research and found some good recipes but ended up making up our own. So here it is kids…

Herbed Pork Tenderloin

Print this recipe!

Where is the tenderloin again? Is that near the axilla?
  • Servings – 2
  • Prep time – 10 minutes
  • Cook time – 45 minutes

Ingredients

  • 1 pound pork tenderloin patted dry
  • 2 tablespoons olive oil
  • 1 tablespoon balsamic vinegar
  • 1 small onion, finely minced
  • 2 cloves garlic, finely minced
  • 1/2 teaspoon dried rosemary
  • 1/2 teaspoon dried oregano
  • 1/2 teaspoon basil
  • 1/2 teaspoon paprika

Protocol

1. Preheat your oven to 400F.

2. In a shallow plate, mix together all of the ingredients above except for the pork.

Yum!

3. Roll the pork in the rub making sure to cover the entire surface.

Starting to look good...

4. Transfer the pork into a baking dish and roast in the oven for 40 minutes or until the meat reaches 145F (you might want to check around 30-35 min or so).

5. Remove from the oven and let rest for 10 minutes.

6. Serve and enjoy!

DSCN5881

-D&E

P.S. Today is Erica’s last class as an undergrad!